Thursday, September 24, 2015

Tools of the Frankenputer workshop.

I use a number of tools when I work on computers. Most of them are actually hand-me-downs from my dad that I use on any number of things.  But here you will find a collection of the tools I recommend getting your meat hooks on if you are going to work on computers.

*IMPORTANT NOTE*  Avoid magnetic tools for use on your PCs.  Magnetized things can do funky things to your hardware so avoid anything magnetic when working on computers.


 I got good set of standard screw-drivers.  These go a long way.  They are simple and do the job right.  These are an 8 piece set of Craftsman I bought on sale at a SEARS that was closing down.  Clear handles are Philips Head and the red handles are Flat Head.  I recommend using the largest screwdriver that fits the head.  This will minimize slipping and lessen damage to the screws and driver.  I use the Phillips on the far left more often than any of the others because most tower screws are a standard Phillips size.

The drivers in this picture are hand-me downs from my dad.  The left one is a 1/4" drive driver and the red is a ratcheting 3/8" drive driver.  In between are sets of Philips, Flat, Torx, and Hex head bits.  The good thing about these bits is the variety and replace-ability.  They're handy as a more compact and portable screw-driver set.
 Their adapters are removable as well and can be replaced when lost, damaged, or worn out.

Close ups of the drivers, the tips, and the adapters.


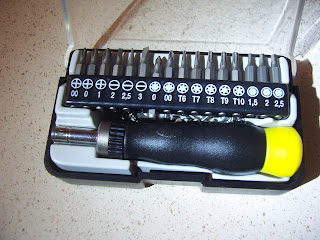
This is a mini set of flat-heads, Torx, Hex, and Philips.  The driver also has a ratcheting feature that comes in handy on those tighter screws.  I use this most when I'm working on laptops.  I scored this set at a NAPA auto-parts store.  Though similar kits can be found online easily.


 Here you can see the difference in size of the 1/4" drive and the mini drive set.
 A close up of all the little bits.
 I also use these socket head drivers for certain PC tower screws that have hex heads.  These are the easiest to use because they don't slip like a how Philips or Flat tend to.  They also hold the screws to them for those hard to reach spaces without being magnetic.  These are more hand-me-down tools.
 Close up of the socket heads.

 I also find myself using these tools every once in a while.   The snips on the left I actually found in a parking lot one day and they were rusted stiff.  Pliers, mini-needle-nose vice-grips, and some needle nose pliers.  The pliers are handy for those snap-on ends that some tower's face-plates use to attach to the front.
I soaked the snips in WD-40, scrubbed them with a steel wire brush, and soaked them again.  Eventually they broke loose, cleaned up and have been a fantastic pair of snips ever since!
 This one is a little unusual and I can't say I use them a lot but they sure come in handy when I do use them.  These are mechanic picks.  Usually used for pulling gaskets or o-rings, or whatever you might need them for.  I sometimes use them on my computers to align mounting holes, to push in or pull our wires, or snap down or disengage clasps like what you find on RAM slots.


A couple of tweezers are a good idea too, they are good for removing and installing jumpers if you need to change a setting on your motherboard without disassembling everything to get to them.  I also have used them to fish out dropped screws.
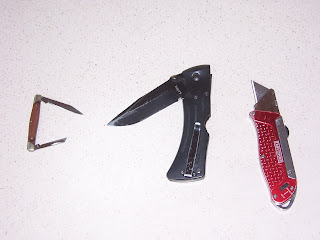
 I knife always comes in handy.  I keep the small duel-bladed on in the bay drive drawer and I use it often.  I use it to cut open packages of new hardware and to cut the tips off new thermal compound tubes if need be.
 A good flashlight is a must as well.  I have a Maglight XL-200 I use all the time and an old hand-me-down franken-Mini-Mag that has had an LED conversion done to it. 
  Sometimes the XL200 is too bright where the Mini-Mag isn't.

  So those are pretty much the tools of the trade for me.  If you have any other clever ideas let me know, I love buying new tools!

Sunday, September 20, 2015

Momma's old laptop part 2

 The new RAM arrived.  Time to remove the RAM access screws.
 New RAM sticks
 Pull out the side latch thingies.
 New RAM installed
 The second RAM slot is on the opposite side and has it's own access.
 New stick popped in.
This should double the amount of RAM.  before it was 2 sticks of 512MB.  Now it's two sticks of 1GB.  This is a 32 bit computer so that means single-core and Windows XP or older.  The hardware only supports up to 2 GBs of RAM and Windows XP only supports up to 3GB total.


After this swap I couldn't get it to boot past the BIOS.  It would sometimes get to the Windows loading screen but then it would freeze.  First course of action is to re-install the original RAM sticks and see if it returns to previous operational parameters.  If all is well then the next step is to pull it apart again and run one of the new sticks at a time to see if maybe I got a bad one.  If it still does the thing I need to double check the new heat-sink to verify that it is fully contacting the CPU for proper heat dispersion.

 -The next day-

The heatsink is functioning properly.  After doing a RAM shuffle I discovered what I believe to be the only three possibilities:  Either it only supports 1.5GBs of RAM or one of the new RAM sticks is bad, or not supported by the hardware.  One RAM stick gave me failure to boot in one slot and blue-screen-of-death in another.  With it removed the other new stick functioned properly with no issues.  So I was unsuccessful at doubling the RAM, however I did increase it by 1.5.  Maybe I'll try this other 1GB in MY old IBM Thinkpad...


The new battery arrived today too!  Laptop batteries go bad.  Here is a brief article about it: LINKY


They are also relatively cheap!  About 15 bucks from Ebay with free-shipping got me a new battery.

So basically, use the battery.  Don't let it die completely and don't leave it plugged in all the time.  Also it is a good idea to get some sort of lap pad to help dissipate the heat it produces because heat is bad for batteries.


 The Palm rest piece was cracked all the way through here at the mouse-buttons.  I figured that I could fix it.
 Busted out my trusty E-6000 glue and disassembled the palm rest once more.  I've used E-6000 for a lot of repairs.  I've glued side mirror glass back on with excellent results.  I also glued the bottom of a plastic bin back together and I still use it to tote full water bottles to the shooting range.  Now to use it on a laptop!
 It might not look that great, but it'll hold.


 There were A LOT of programs installed on this laptop.  The list of startup programs was horrendous.  I went through and removed junk and disabled useless startup programs.  Boot time is now much faster.
The screen-shot above and below are of a program my good buddy pointed me to called "Speccy."  And here is a mini-review of it along with the end of this laptop refurb.  It's a super hand little program that consolidates all your info into the following screen and sub-menus.  Its pretty nifty if you need model numbers or specific data on your system.  You can get this information through other programs but for them it's more of an afterthought and with Speccy it's the main purpose.  It has one flaw I've noticed since downloading it yesterday and trying it out:  The RAM data displayed in the summary is misleading.  Above it shows 1GB of installed RAM and at that time it was correct.  Below it shows 2GB.  This is after fiddling with the RAM sticks and figuring out what worked.  I only had 1.5GB of RAM installed but for some reason it showed 2GB here.  On the side menu under the RAM section it showed the correct data, but here it was incorrect.  not sure whats up with that, but it's the only thing I've noticed about it so far that I would call a negative.

And that's my cheap refurbish on an old laptop that's still kickin'!
The End.

Momma's old laptop part 1

My mom has an old IBM Thinkpad that was just starting to get a little old.  Okay, so it's way old.  Throwing 20 or 30 dollars at it though is a lot cheaper than going out and buying a new one so that is why I did in this post.

First of all let me say that you have to be careful when you work on a laptop.  Or any computer, really.  I tried to blow the dust out of it with an air nozzle on an air compressor and while it did great at blowing the dust out, it also did great at blowing all the blades off the fan.  So that is the first thing I set out to fix:
 Take note of the fuzzy kitty stickers mod.
 First up is to remove the keyboard.
 There are 3 screws on the bottom of the laptop with a little keyboard symbol.  Remove those, then you gently pry the keyboard toward the screen till the tabs have enough clearance and you lift it out.
 You have to gently pull the cable that connects the keyboard to the motherboard and it comes right off.  We now have access to the RAM (which we will get to later when the new sticks arrive) and partial access to the fan/heat-sink.
 Little sticky thingers hide screws for removing the the touch pad and palm rest.  Remove those.  There are also a few more screws that need to be removed that have the touch pad symbol by them.


Gently pull out the touch pad ribbon cable.

 And this is why you don't use compressed air out of a garage air-compressor for blowing dust out of a laptop.  You should use a can of air, a vacuum, or physically remove the fan and heat sink and scrub the dust off of it all.
 Some of the fan blades were just sitting there.  I had to shake the laptop in a few different directions to get all the broken pieces out.
 For these old IBMs the heat sink and fans came as a combo.  You can get just the fan, but I'm not sure how you remove it from the heat sink yet.  This refurbished one from Ebay was only 10 bucks with free shipping.
 Next I used my Arctic Silver thermal compound kit and I cleaned the old compound off the CPU and the GPU and the refurbed heat sink.
 The refurbished heat sink had a new thermal pad install already for the GPU so I applied a daub to the CPU and installed the new thing.
 Close up of the new fan, notice it's power cord is plugged into the motherboard.
 The GPU heat pickup.


 Until the rest of the parts arrive, that is all.